Installation
of OpenCL
1.
Microsoft Visual Studio:
· Microsoft Visual Studio C++ Express is
required on which you will right your C/C++ programs that should be run using
OpenCl libraries.
· Download it from the following link: http://www.visualstudio.com/en-US/products/visual-studio-express-vs#webInstall
· Download the latest Express version available
for Windows Desktop suitable to your hardware.
·
Installation
process:
1.
We start
with the familiar install startup menu:

2.
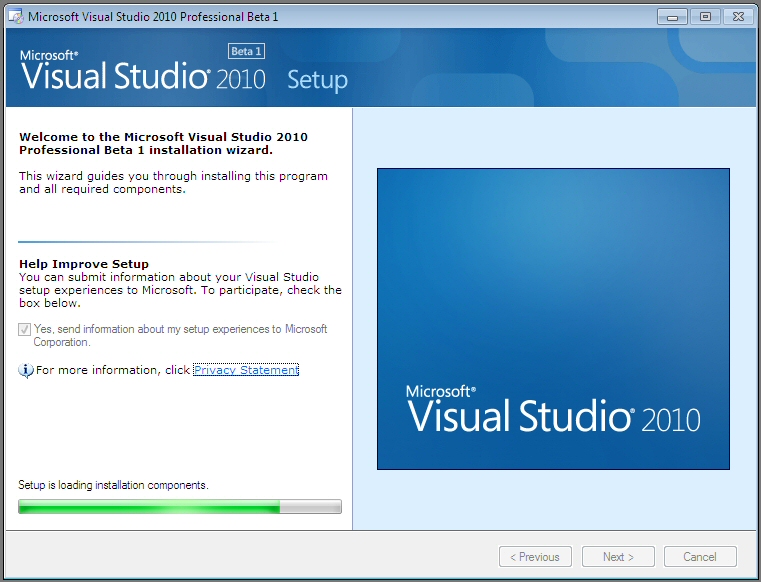
Then we get a banner page, as
things start up.
3.
Next, we
get a license page, as well as an overview of what is going to be
installed.

4.
Next up is an options page:

5.
Now the actual installation
begins and we can see a more complete list of all the components that will be
installed.


6.
You’ll have to reboot after the
.NET Framework 4 installation.

7.
You’ll get a warning dialog,
indicating that SQL Server 2008 has compatibility issues on Windows 7 and
suggesting that you install SP1.

2.
AMD-APP-SDK:
- download APP-SDK suitable to your hardware
configurations from
http://developer.amd.com/tools-and-sdks/heterogeneous-computing/amd-accelerated-parallel-processing-app-sdk/downloads/
Installation Procedure:
Step 1. Choose the AMD APP SDK executable appropriate for your system,
and double-click it.
– For 32-bit Windows Vista, Windows 7 SP1, and Windows 8 systems,
choose
AMD-APP-SDK-v2.8-Windows-32.exe.
– For 64-bit Windows Vista, Windows 7 SP1, and Windows 8 systems,
choose
AMD-APP-SDK-v2.8-Windows-64.exe.
The extracted files are placed automatically into
C:\AMD\SUPPORT\<name of file you double-clicked.>\.
Step 2. If the setup program does not start automatically after the
files have been extracted, access the subdirectory of C:\AMD\SUPPORT\ with the extracted files, and
double-clickSetup.exe. A welcome screen appears, prompting you to choose a language.
The
default is English. Click Next. The Select Installation Operation screen
appears.
Step 3. Click the install icon. The resulting screen lets you choose the
type of installation, as well as the default installation location.
Choosing Express installs:
– AMD APP SDK v2 Developer
– AMD APP SDK v2 Samples
– AMD APP SDK v2 Runtime4 of 9 Installation Notes
Choosing Custom lets you select the components (Developer and Samples)
to install. If you select Express, continue with Step 4. If you select Custom, skip
to Step 9.
Step 4. If you select Express and click Next, the End User License
Agreement appears. Click Accept. This causes a temporary “Analyzing System” screen to appear. The
program is detecting the type of graphics hardware and software currently installed
on the system. If an older version of one of the components is already installed, a
warning appears, indicating that the installation cannot continue before it is removed.
(In this case, use Program and Features (in Windows Vista, Windows 7 SP1, or Windows 8) to
remove the older version of the component named above the lower progress bar.)
Step 5. When the InstallShield Wizard screen appears, click Next. This
results in a prompt to accept the default folder into which the extracted files are placed.
Click Next.
Step 6. When the License Agreement appears, first click the button next
to “I accept the terms in the license agreement.” Then, click Next.
Step 7. On the next screen, click Install to begin installing the SDK
files. A progress bar appears. After the installation is complete, a confirmation screen
appears. Click Finish. This completes the installation of the AMD APP SDK v2.8 files.
Step 8. The following steps are only if Custom was selected in Step 3.
Step 9. If you clicked Custom in Step 3., above, and click Next, a
temporary “Analyzing System” screen appears. The program is detecting the type of graphics hardware
and software currently installed on the system. After several seconds, the Customize
Install screen appears. This lets you specify which components you want to install. By
default, all components are checked.
Step 10. Select the component(s) you want to install, and click Next.
The End User License Agreement appears. Click Accept.
Step 11. When the InstallShield Wizard screen appears, click Next. This
results in a prompt to accept the default folder into which the extracted files are placed.
Click Next.
Step 12. A progress bar appears, followed by a confirmation screen that
the installation is complete. The log file can be seen by clicking on the View Log option.
Click Finish to complete the installation.
With SDK 2.8 or later, clinfo.exe is copied under C:\windows\system32\
instead of under C:\Program Files\AMD APP\ on 32-bit Windows, or C:\Program Files
(x86)\AMD APP\ on 64-bit Windows.
Program for vector addition in OpenCL :
Program for vector addition in OpenCL :
#include <stdio.h>
#include <stdlib.h>
#include <math.h>
#include <CL/opencl.h>
// OpenCL kernel. Each work
item takes care of one element of c
const char *kernelSource
=
"\n" \
"#pragma OPENCL
EXTENSION cl_khr_fp64 :
enable
\n" \
"__kernel void
vecAdd( __global double *a,
\n" \
"
__global double
*b,
\n" \
"
__global double
*c,
\n" \
"
const unsigned int
n)
\n" \
"{
\n" \
"
//Get our global thread
ID
\n" \
" int
id =
get_global_id(0);
\n" \
"
\n" \
"
//Make sure we do not go out of
bounds
\n" \
" if
(id <
n)
\n" \
"
c[id] = a[id] +
b[id];
\n" \
"}
\n" \
"\n"
;
int main( int argc, char*
argv[] )
{
//
Length of vectors
unsigned
int n = 100000;
//
Host input vectors
double
*h_a;
double
*h_b;
//
Host output vector
double
*h_c;
//
Device input buffers
cl_mem
d_a;
cl_mem
d_b;
//
Device output buffer
cl_mem
d_c;
cl_platform_id
cpPlatform; // OpenCL platform
cl_device_id
device_id; //
device ID
cl_context
context;
// context
cl_command_queue
queue; // command
queue
cl_program
program;
// program
cl_kernel
kernel;
// kernel
//
Size, in bytes, of each vector
size_t
bytes = n*sizeof(double);
//
Allocate memory for each vector on host
h_a
= (double*)malloc(bytes);
h_b
= (double*)malloc(bytes);
h_c
= (double*)malloc(bytes);
//
Initialize vectors on host
int i;
for(
i = 0; i < n; i++ )
{
h_a[i]
= sinf(i)*sinf(i);
h_b[i]
= cosf(i)*cosf(i);
}
size_t
globalSize, localSize;
cl_int
err;
//
Number of work items in each local work group
localSize
= 64;
//
Number of total work items - localSize must be devisor
globalSize
= ceil(n/(float)localSize)*localSize;
//
Bind to platform
err
= clGetPlatformIDs(1, &cpPlatform, NULL);
//
Get ID for the device
err
= clGetDeviceIDs(cpPlatform, CL_DEVICE_TYPE_GPU, 1, &device_id, NULL);
//
Create a context
context
= clCreateContext(0, 1, &device_id, NULL, NULL, &err);
//
Create a command queue
queue
= clCreateCommandQueue(context, device_id, 0, &err);
//
Create the compute program from the source buffer
program
= clCreateProgramWithSource(context, 1,
(const
char **) & kernelSource, NULL, &err);
//
Build the program executable
clBuildProgram(program,
0, NULL, NULL, NULL, NULL);
//
Create the compute kernel in the program we wish to run
kernel
= clCreateKernel(program, "vecAdd", &err);
//
Create the input and output arrays in device memory for our calculation
d_a
= clCreateBuffer(context, CL_MEM_READ_ONLY, bytes, NULL, NULL);
d_b
= clCreateBuffer(context, CL_MEM_READ_ONLY, bytes, NULL, NULL);
d_c
= clCreateBuffer(context, CL_MEM_WRITE_ONLY, bytes, NULL, NULL);
//
Write our data set into the input array in device memory
err
= clEnqueueWriteBuffer(queue, d_a, CL_TRUE, 0,
bytes,
h_a, 0, NULL, NULL);
err
|= clEnqueueWriteBuffer(queue, d_b, CL_TRUE, 0,
bytes,
h_b, 0, NULL, NULL);
//
Set the arguments to our compute kernel
err
= clSetKernelArg(kernel, 0, sizeof(cl_mem), &d_a);
err
|= clSetKernelArg(kernel, 1, sizeof(cl_mem), &d_b);
err
|= clSetKernelArg(kernel, 2, sizeof(cl_mem), &d_c);
err
|= clSetKernelArg(kernel, 3, sizeof(unsigned int), &n);
//
Execute the kernel over the entire range of the data set
err
= clEnqueueNDRangeKernel(queue, kernel, 1, NULL, &globalSize,
&localSize,
0,
NULL, NULL);
//
Wait for the command queue to get serviced before reading back results
clFinish(queue);
//
Read the results from the device
clEnqueueReadBuffer(queue,
d_c, CL_TRUE, 0,
bytes,
h_c, 0, NULL, NULL );
//Sum
up vector c and print result divided by n, this should equal 1 within error
double
sum = 0;
for(i=0;
i<n; i++)
sum
+= h_c[i];
printf("final
result: %f\n", sum/n);
//
release OpenCL resources
clReleaseMemObject(d_a);
clReleaseMemObject(d_b);
clReleaseMemObject(d_c);
clReleaseProgram(program);
clReleaseKernel(kernel);
clReleaseCommandQueue(queue);
clReleaseContext(context);
//release
host memory
free(h_a);
free(h_b);
free(h_c);
return 0;
}

No comments:
Post a Comment